Sunday 5 June 2011

Using Learning Score - Evaluating ATM Online

This lesson will demonstrate the key functions and buttons when using Learning Score.

Getting Started

media_1307265215872.png
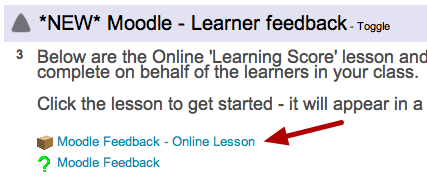
Click on the Lesson link to get started.

On the next page, simply press the 'Enter' button. The Lesson will open in a new window.


The Lesson

media_1307265469707.png
You will now see the lesson in a new window. You can resize it like any other normal web window.

Using the timer

media_1307265768020.png
To start the timer, click on the button above. The timer will move, giving you a good idea of the pace of the lesson. You can drag the time back and forth should you want to.

Starting the lesson

media_1307265865165.png
There are 2 ways to 'run' the lesson.

You can either click on each individual 'block' with the mouse and then hit the Escape key to return to the main lesson page.

Or you can use the 'Play' button as shown above. This is the most common method as it uses the natural flow of the session.

Following the lesson

media_1307265956383.png
Once you hit Play, you can then use the cursor keys on your keyboard or the arrow keys on the screen to move onto the next step.

Launching web pages

media_1307266036830.png
As the lesson progresses, you will come to a page that launches a web page. You don't have to launch ATM Online if you don't want to, but it can be useful to remind students about layout, assignment submissions etc.

Simply click the text to open ATM Online in a new window.

Please note: Sometimes the Learning Score can 'disappear' temporarily when a new page is opened. If you are on a Mac, simply use the Expose button (F3 usually) to find the Learning Score window.

Now follow the lesson - using the Timer line as a guide. You should achieve a thorough, well paced session and generate some interesting content and feedback. Please then complete the Questionnaire on the Year Tutor Zone.


Learners can also leave their own feedback on the Student Zone or by emailing me direct.


Sunday 31 October 2010

How to assign a Tutor to a Group

This tutorial looks at how you manage your tutors by first setting them up as a Tutor and then assigning them to a specific group of students.

Access to Music staff - Before you start, log in with your Year Tutor or Pathway Leader account.


Enrol your tutors

media_1288341089156.png

The first step of the process is to add your tutor to the course. To do this, click on Assign Roles.

Choose Tutor role

media_1288516616183.png

Next click on Tutor.

Non Access to Music readers - you may see more than just these roles.

Find your tutor

media_1288516642583.png

Use the search box to find your tutor. Once you've found them, add them to the list of tutors on the left by clicking the <=== arrow.

Now return back to the main course page


Click on Groups

media_1288341944152.png

Find the group

media_1288516696119.png

Find the Group that you want to assign the tutor to (1). Clicking on it should show you a list of participants already in that Group. This appears in the right hand window.

Now click on Add/remove users (2)

Find the tutor

media_1288516815219.png

Find the Tutor you want to assign to the group in the list on the right. If there are a lot of Students and Tutors, you can Search by name (1). Tutors appear at the bottom of the list. Once you've found them, click on the Add button (2) and - hey presto! - they're now assigned to that group!

How it will look when a Tutor is assigned to a Group:

media_1288516882208.png

Why am I doing this? Well, if you are using 'Separate Group' activities, it means that tutors will only see the work of their group. This is ideal when you have a course with multiple groups of students all submitting to the same assignment.


When I add a Tutor it says 'Multiple Roles'. Why?

media_1288516956728.png

If you see this, it means that the Tutor in question has more than one role. The reason for this is that often the Tutor has enrolled as a student onto the course prior to being assigned as a Tutor.

To resolve this, simply click on the Participants link, go to Students, find the tutor in question and remove them from the student list by clicking the ===> button.

You can also look at a tutor's Profile and this will show the Group their associated with, and the roles they have too.

media_1288517091970.png

Saturday 25 September 2010

Using Soundcloud to store MP3s

Soundcloud is a fantastic free website which allows you to store and discuss music online. Better still, you can embed a Soundcloud Player into any HTML section of Moodle, including Assignments.

This could be considered as a viable option to storing music on the network.

Create a Soundcloud account

Create_a_Soundcloud_account.png

Go to www.soundclound.com and create a new account

Follow the instructions...

Follow_the_instructions....png

Simply follow the account instructions and sign up!

Edit your Profile

Edit_your_Profile.png

Give Soundcloud some information about you!

Upload your Music!

Upload_your_Music_.png

Click on the Choose a File button and locate your MP3.

Fill in the blanks

Fill_in_the_blanks.png

Whilst the song is uploading, give as much information as you can.

The More Info section includes content such as VIdeo links, iTunes Store links, artwork, keywords and more.

The bottom of the screen gives you a countdown to completion. Once uploaded, click Save.

Your song is online!

Your_song_is_online_.png

Now your tune is uploaded, and you can see it in all its waveform glory.

Once people start listening, you'll see a play count on the right hand side (1) and, should people leave them, comments about your track (2).

To add your song into an Assignment or Forum post, click on (3) - </>Share

Getting the Embed Code

Getting_the_Embed_Code.png

Click on the </> Share icon and a dropdown menu will appear.

To get the code for Moodle (and any other website) click on the code that starts with <object height=81"> and copy it (cmd+C on a Mac)

Notice you can also easily add your tracks to Facebook, Twitter, MySpace and more! The instructions are straight forward on how to do this, so I wont be covering them here.

Adding it to Moodle - Step 1

Adding_it_to_Moodle_-_Step_1.png

Please note: This works for Assignments (such as Online Text), Forums or anywhere that uses the HTML text box area (recognisable by the toolbar above the text box).

Firstly, introduce your song.

Then, click on the icon < >. This takes you into HTML mode.

Adding it to Moodle - Step 2

Adding_it_to_Moodle_-_Step_2.png

Now simply paste the code you copied from the Soundcloud page.

It may look a bit messy, but don't panic!

Once you've pasted it in, click on the < > icon again to return to 'Normal' mode.

Please note: After pressing < > you may not see the player immediately. It will appear once you have saved your work/forum post.

Success!

Success_.png

The Soundcloud player has now been successfully integrated into the Moodle assignment or message board.

You can now click Save at the bottom of the page and return to your normal view.

Sunday 19 September 2010

Using Activity Reports to monitor student involvement

This lesson demonstrates some key tools for seeing which activities your students are engaging in (or not as the case may be!) and how to address this issue. You can also view the activities of your tutors too.

Introduction

With so many resources, activities and assignments availabl, it may appear to be difficult to keep track of what your students and tutors are doing and how they are engaging.

In fact, it's really very easy to see how your students and tutors are participating - either as a whole class or on an individual level.

Access the Reports

Access_the_Reports.png

The first thing you need to do is click Reports on the Admin Panel.

Choosing a Report

Choosing_a_Report.png

You now have a large area at the top and then four options to choose from, each showing a different report.

Let's look at each one.

'Choose which logs you want to see'

_Choose_which_logs_you_want_to_see_.png

Each of these drop down boxes allows you to choose various features that you may want to see.

1 = Allows you to choose which Unit or Course that you teach on
2 = Allows you to choose whether you want to see the actions of everyone on the course or certain individuals (both students and tutors)
3 = Choose a specific date to view (you can also select 'All days')
4 = This gives you a list of the activities on that course - for example Forums, Assignments, Quizzes etc
5 = All Actions refers to whether they have viewed or participated in that activity. This can be left as is.
6 = This allows you to determine whether you just want to see the results on screen or download in various formats. This can be left as is.
7 = 'Get these logs' does exactly that!

So in this instance I am going to stick with the course above, choose a specific student as the participant, look at Monday 9th November and keep 4,5 and 6 as their default settings.

Result!

Result_.png

I can now see the three activities that the student has engaged in. He viewed the course at 4:55, he looked at a resource at 4:56 and then looked at the Forum at 6:33. which ties in with my lesson structure for that day.

Give it a go!
Why not look at one of your courses and view all your students actions for a specific course on a specific day? And then just look at one particular student for that day too!

More reports

More_reports.png

Let's go back to our original reports screen and look at the four other options.

1 = Live logs from the past hour does exactly that - it lets you see what's been going on in that course over the last hour. This looks at all students and tutors and all activities.
2 = The Activity Report gives you an overview for all actives on a page, including how many 'hits' it's had and the last time it was accessed (see below)
3 = The Participation Report lets you see the activity of groups of people (such as students) in relation to a specific activity (more below)
4 = Statistics are currently off and cannot be viewed.

Please note that these Reports only provide information on the course you are currently working in.

Assuming that Live Logs from the past hour makes sense, let's look at 2 and 3.

Activity Report

Activity_Report.png

The Activity Report is very useful in that it gives you a quick overview of every activity and how 'active' is has been.

This Activity Report, for example, is taken from the 'How to use Moodle' style course. You can see that some Resources are clearly more popular than others and that the Message Board at the top hasn't been that well used.

If this was a course which required active involvement from the students, you could easily feed this information back and use it to assist your planning and guidance.

Compare this to the Activity Report for the course we looked at earlier:

Activity Report for a different course

Activity_Report_2.png

Here we can see that the Discussions board has been very popular and used extensively, where as some of the resources from Week 1 have had very little activity.

Participation Report

Participation_Report.png

Returning to the first course we looked at, I now want to look at how students have been engaging with Resources and Activities in more depth.

Having clicked on Participation Report I'm given the following options to choose from.

1 = Activity Module. Here I can choose which aspect of the course I want to look at, for example Assignments, Resources, Quizzes, Forums etc.
2 = Look Back - choose how far back you want to look (days and weeks)
3 = Who are you looking at? This could be tutors or students, but usually you would choose Students
4 = There is no need to change this option

Now click Go!

In the following example I want to see which of my students accessed a Video about the Combinator in Reason, something I asked them to do over a 2 week period.

Results!

Results_.png

The Participation report tells me that only three students have watched that video via the Resource available on their course page. It even tells me that the first student in the list has viewed it six times. You may want to discuss this with your students in case they are struggling with a specific aspect.

From student 4 downwards, every student is listed as No. And, as a tutor, you can now address this.

At the bottom of the screen you need to choose Show All and this will display all students on one page.

Take action!

Take_action_.png

By clicking (1) you select all students with No next to their name. You can then choose to 'Add/send a message' (2) and then simply hit OK (3)

Have a go and explore the Activity Reports as much as you can - they really are a great way to keep track of what's happening on your course!

Saturday 18 September 2010

Making a course with Collapsed Topics/Weeks

This lesson will guide you through how to edit and manage a course using the Collapsed format (weeks and topics).

It assumes you have chosen Collapsible Topics/Weeks in the Course Format under the main course Settings.

Turn Editing On

media_1280846370710.png

Click Turn Editing On in the top right-hand corner.

Click on one of the Topics/Weeks

media_1280846428010.png

Edit the Topic

media_1280846439193.png

Click on the pencil icon to edit the Topic name. Weeks are automatically named (determined by the start date in the course settings).

Enter your Title and Save

media_1280846461871.png

Your title appears!

media_1280847045877.png

Add a Label

Picture_5.png

Now click on Add a Resource... and choose 'Insert a Label'

Enter your label text

media_1280846540302.png

You can now type in your content into the label. If you find the window is too small, click on the expand window icon (circled in red).

Using the Expanded window

media_1280846610618.png

The bigger window now gives you more room to enter your content.

Save!

media_1280846627352.png

Here it is!

media_1280846662337.png

The text has now appeared in the label! However the title is a bit squashed. We can fix that.

Using Heading format

Picture_6.png

Edit the label (click on the pencil) and highlight your title text. Now choose a different Heading option. Each Heading has a different look and feel. Also set the font size to something suitable.

Much better!

Picture_7.png

Now the title is less squashed and looks a lot better.

Moving topics can sometimes be awkward in Firefox, however the move arrows do appear in Safari and Chrome. You may want to switch between browsers but if you're using Firefox, this is the easiest way to do it.


Click Settings

media_1280846739197.png

Change the Format to Topics Format and Save

Picture_8.png

You can now move the sections around

media_1280846785657.png

If you do not see the crosshairs, you may see two black arrows which, when clicked, allow you to move the sections to your desired area.

Once you've done this, change the Settings back to Collapsible Topics/Weeks and you're good to go!